A BERRY MERRY CHRISTMAS

I like a good pun, don’t you? When I needed a name for this blog post, I was trying to determine what the name of the color was in our Holiday decor….wine? merlot? burgundy? I chose Berry just so I could name the post “A Berry Merry Christmas”. HA!

Once again, I am participating in the Winter Eclectic Home Tour Hosted by Jessica Rey of Domicile 37 (thank you for having me!) I cannot believe it is Christmas time already. I feel like I just put away our holiday cheer into those big plastic totes and tucked them away, but here we are again. I have a love/hate relationship with decorating for holidays. I hate bringing more items into a room as it often makes it feel cluttered. On the other hand, I hate removing my precious items because so many of my decor finds are very special to me. This year I tried to find a balance by swapping out a few things and keeping it overall very minimal.

While our normal holiday styling is usually pretty neutral, I was inspired by a CB2 holiday ad and wanted to use this rich berry color within our home.

IMG_0426.jpg

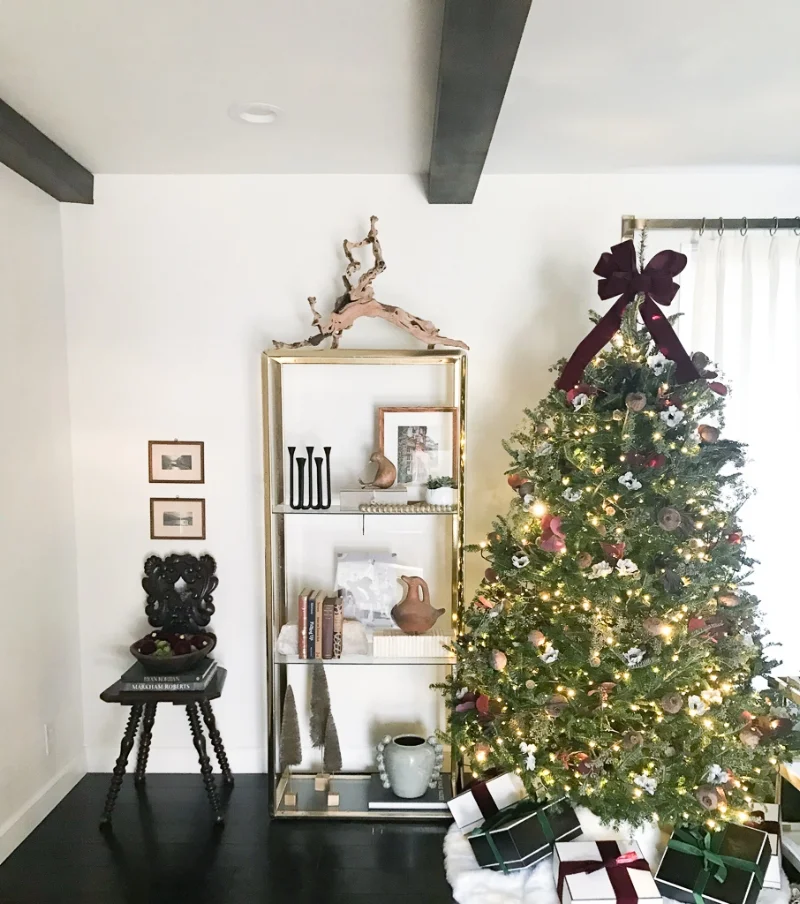
I reached out to the owner of Willow and Star Flowers, Allyson Wells Podell, for some guidance on finding the winning combinations of flowers. With her help, I landed on a mix of anemones, naked seeded eucalyptus, tinted eucalyptus, poppy seed pods, and scabiosa seed pods. I threw in some preserved burgundy stems I had leftover from thanksgiving to add some depth and additional color. All but two of the flowers on the tree are real (preserved) but I did have to rely on good ole silk for the tinted eucalyptus and anemone. I would love to grow my collection of preserved flowers and to build on this for next year!

IMG_0428.jpg

Underneath the tree are my favorite gift boxes from Target. These have been around for years and come in different colors each season. I used some lush berry and green velvet to garnish the simple boxes and all lay on this faux fur tree skirt that I have been using for years.

IMG_0431.jpg

I wanted to keep our mantle very simple this year. I draped my favorite cedar garland asymmetrically to give it a bit of uniqueness and kept the stockings to one side this year to avoid the clutter of 5 stockings (yes, the dogs have stockings!)

Faux LED candles adorn the top along with some velvet ornaments from Hobby Lobby. While our tree did not have any traditional ornaments, I use them within the mantle and to fill bowls.

IMG_0338.jpg
IMG_0339.jpg
IMG_0341.jpg

Generally I don’t decorate our railings/entry too much since it is not being renovated. However, since we have these beautiful new railings, I thought I might as well. The pictures will show the reality of a reno in the background but hey, it’s real life!

IMG_0350.jpg

Well, folks, that’s all I have to share with you thus far. To say we are behind with filling our home with festive goods would be an understatement. Sometimes life just happens and you have to go with the flow. I am shooting to finish up our holiday decor over the weekend and I will share the rest with you via good ole Instagram.

Thank you again to our Host, Jessica Rey, for hosting this fun blog hop. Be sure to swing by the other tours for some lovely home decor eye candy!

One Room Challenge-Week One


Hi hello! I am thrilled (and crazy nervous) to be jumping on board for my first ever One Room Challenge™.  For years I have read hundreds of ORC posts, watched their transformations....would daydream about participating...being a feature designer...fantasizing about the room I would transform.....but then I would go put on Netflix or Harry Potter and sit on the couch. Whaaaa whaaaa.    

Thanks so much to Linda of Calling it Home  and Media Partner House Beautiful for hosting this fab-u-lous opportunity and allowing little ole aspiring design bloggers, like yours truly, to participate.  

1475460688709.png

I am new to blogging.  This my second post everrrrrrrrr.  Go big or go home, right?! So I apologize for any mistakes as a give myself a crash course in blogging while I navigate this 6 week makeover challenge.  

Ready to see the ugliest office ever???

Welcome to 1954!

office1.jpg

Now, I know built-ins are totally in right now.  I love them, wish I had some (they don't go with my house though!).  These are not the type of built ins that the design world is gushing over.  

One of my favorite things about renovating an old home is uncovering the story of the life that lived within the four walls before us.  While I am not a fan of the excessive built in basic book shelves on every. single. wall. in this house, I love the story behind them.  

The previous owner was a Scientist.  Yes, ladies and gentlemen, a real life scientist.  He was an extremely well read man and this home was filled with walls upon walls of books.  I never saw the house in that state (info provided by the realtor) and this "before" picture of mine is actually their after with some help of a stager.  Having my husband agree to remove these has been a battle, but he has finally realized I am right (see that right there? :) ) and that they have to go.  We do not own enough books to even fill one shelf nor are we really avid readers.

The photo below shows the layout and location of the office to the living room.  The living room has already been completely updated and I will be sharing before/after pictures of that in a later post.

office8.jpg


Soooooo...here's a little secret...that's not the current state of the office, but that is where this 6 week design journey is starting.  I have learned from listening to Chris Loves Julia's podcast (if you don't listen, you totally should) that you really do not have to have your transformation in real time.  Yes!!!

The Plan

  • All bookcases removed.  
  • Floors-replaced with espresso engineered hardwood.  This will be running throughout our home w/ the exception of bathrooms and the entryway. 
  • Build out wall.  You cannot see it from this photo but that bookcase to the left is built over a sliding door *insert eye roll*  This closet has another door in the hallway so there is no need for two doors to one small closet.  Oh, 1950s builders, what were you thinking?
  • Let the room ooze with femininity.  You have heard of a man cave, right? Well, this is my woman cave.  Blush.  Florals. Brass. Maybe some unicorns and rainbows.  
  • Functional.  I occasionally work from home and am committed to blogging so I need space to work, store my arts and crafts, and so on.  

Mood Board

I am still determining whether I want the rug to be dark/light, sorting out all the details such as art and accessories, but I have laid out the high level design of the room.  

As I mentioned on my welcome page, I do try and mix high/low/DIY as much as possible and this mood board is a perfect example.  I will dive into more details as the weeks progress on sources and costs.  Full disclaimer, I am going to be an open book about cost.  I feel it is extremely important to those wanting to tackle a renovation to have some idea on pricing.  


officemoodboard.jpg


I am so excited to finally be tackling this project and creating a private space where I can work. Stay tuned to next week when the bookcases come down and the surprises behind them are revealed.

Thanks so much for following along!

xo

Saher